
4 posts tagged with "python data pipelines"

View All Tags

· 5 min read
Aman Gupta
info

Check this Colab Notebook for a short and sweet demo.

What is a slowly changing dimension?

Slowly changing dimensions are a dimensional modelling technique created for historising changes in data.

This technique only works if the dimensions change slower than we read the data, since we would not be able to track changes happening between reads. For example, if someone changes their address once in a blue moon, we will capture the changes with daily loads - but if they change their address 3x in a day, we will only see the last state and only capture 2 of the 4 versions of the address.

However, they enable you to track things you could not before such as

  • Hard deletes
  • Most of the changes and when they occurred
  • Different versions of entities valid at different historical times

What is Slowly Changing Dimension Type 2 (SCD2)? and why use it?

The Type 2 subtype of Slowly Changing Dimensions (SCD) manages changes in data over time. When data changes, a new record is added to the database, but the old record remains unchanged. Each record includes a timestamp or version number. This allows you to view both the historical data and the most current data separately.

Traditional data loading methods often involve updating existing records with new information, which results in the loss of historical data.

SCD2 not only preserves an audit trail of data changes but also allows for accurate historical analysis and reporting.

SCD2 applications

Colab demo

Use Case 1: Versioning a record that changes

In environments where maintaining a complete historical record of data changes is crucial, such as in financial services or healthcare, SCD Type 2 plays a vital role. For instance, if a customer's address changes, SCD2 ensures that the old address is preserved in historical records while the new address is available for current transactions. This ability to view the evolution of data over time supports auditing, tracking changes, and analyzing trends without losing the context of past information. It allows organizations to track the lifecycle of a data entity across different states.

Here's an example with the customer address change.

Before:

_dlt_valid_from_dlt_valid_tocustomer_keyc1c2
2024-04-09 18:27:53.734235NULL1123 Elm StTN

After update:

_dlt_valid_from_dlt_valid_tocustomer_keyc1c2
2024-04-09 18:27:53.7342352024-05-01 17:00:00.0000001123 Elm StTN
2024-05-02 08:00:00.000000NULL1456 Oak AveTN

In the updated state, the previous address record is closed with an _dlt_valid_to timestamp, and a new record is created with the new address "456 Oak Ave" effective from May 2, 2024. The NULL in the _dlt_valid_to field for this new record signifies that it is the current and active address.

Use Case 2: Tracking deletions

This approach ensures that historical data is preserved for audit and compliance purposes, even though the record is no longer active in the current dataset. It allows businesses to maintain integrity and a full historical trail of their data changes.

State Before Deletion: Customer Record Active

_dlt_valid_from_dlt_valid_tocustomer_keyc1c2
2024-04-09 18:27:53.734235NULL1123 Elm StTN

This table shows the customer record when it was active, with an address at "123 Elm St". The _dlt_valid_to field is NULL, indicating that the record is currently active.

State after deletion: Customer record marked as deleted

_dlt_valid_from_dlt_valid_tocustomer_keyc1c2
2024-04-09 18:27:53.7342352024-06-01 10:00:00.0000001123 Elm StTN

In this updated table, the record that was previously active is marked as deleted by updating the _dlt_valid_to field to reflect the timestamp when the deletion was recognized, in this case, June 1, 2024, at 10:00 AM. The presence of a non-NULL _dlt_valid_to date indicates that this record is no longer active as of that timestamp.

Learn how to customise your column names and validity dates in our SDC2 docs.

Surrogate keys, what are they? Why use?

Every record in the SCD2 table needs its own id. We call this a surrogate key. We use it to identify the specific record or version of an entity, and we can use it when joining to our fact tables for performance (as opposed to joining on entity id + validity time).

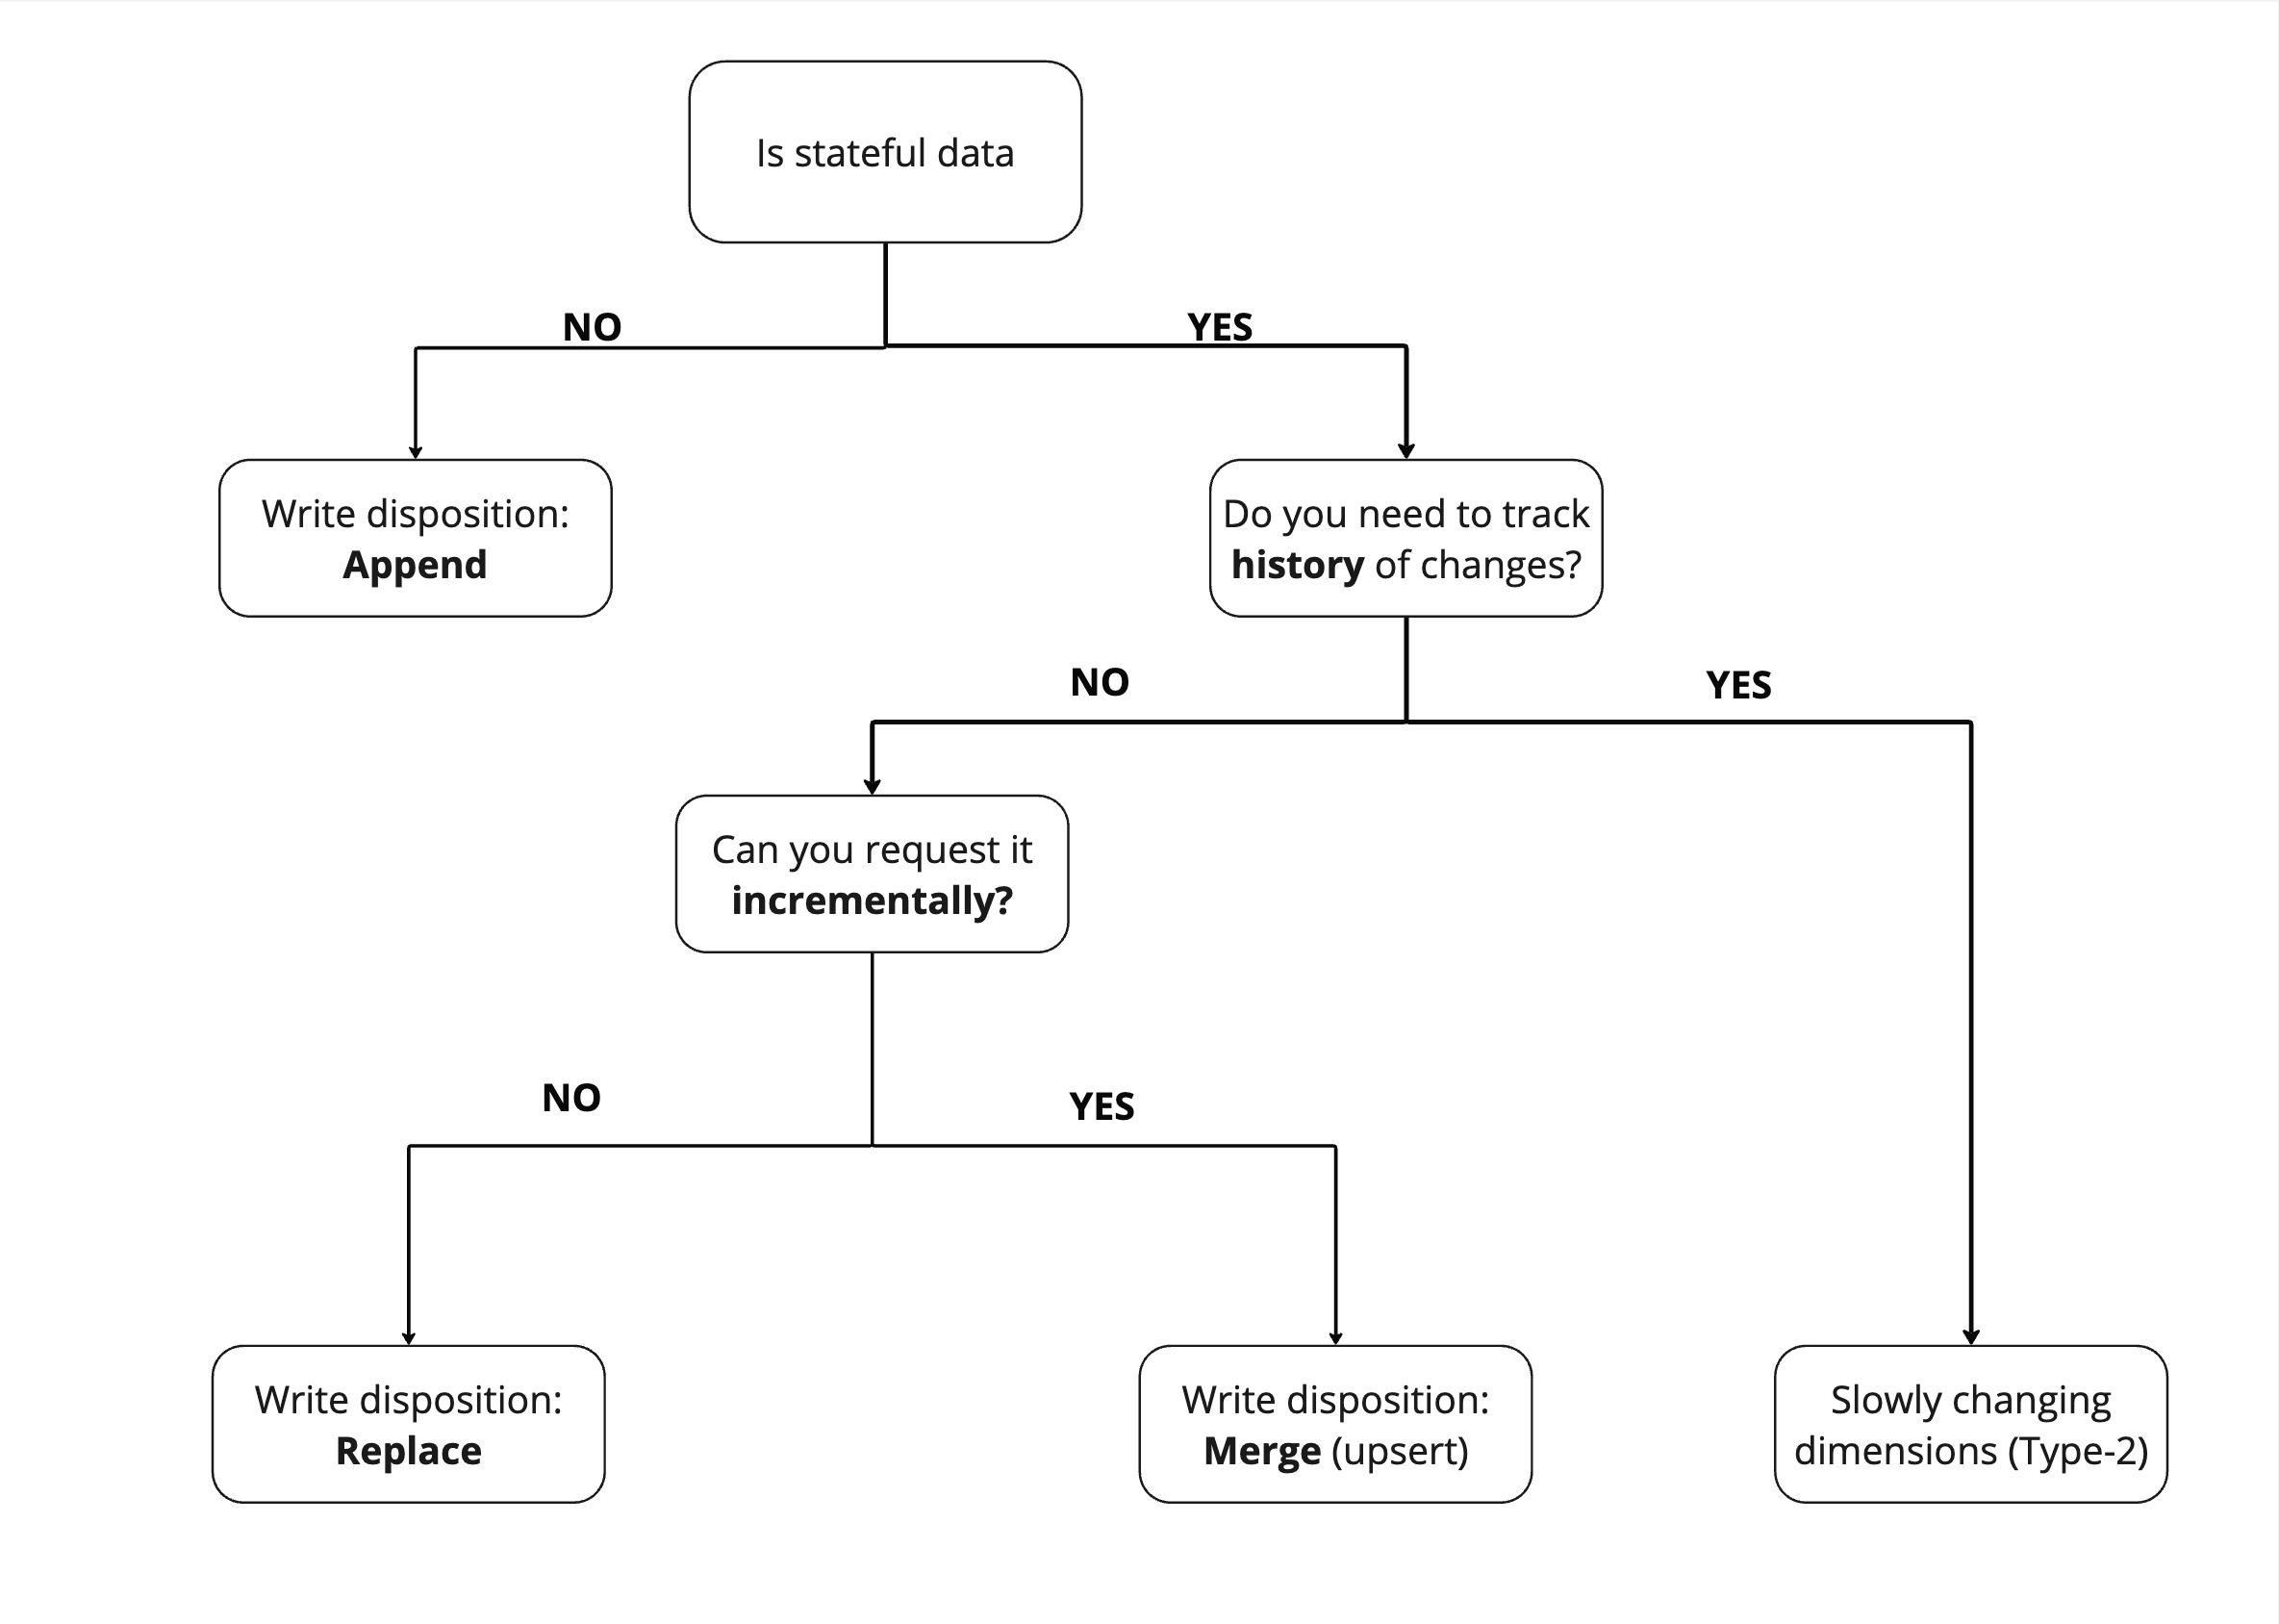
Simple steps to determine data loading strategy and write disposition

This decision flowchart helps determine the most suitable data loading strategy and write disposition:

  1. Is your data stateful? Stateful data is subject to change, like your age. Stateless data does not change, for example, events that happened in the past are stateless.

    1. If your data is stateless, such as logs, you can just increment by appending new logs.
    2. If it is stateful, do you need to track changes to it?
      1. If yes, then use SCD2 to track changes.
      2. If no,
        1. Can you extract it incrementally (new changes only)?
          1. If yes, load incrementally via merge.
          2. If no, re-load fully via replace.

Below is a visual representation of steps discussed above: Image

Conclusion

Use SCD2 where it makes sense but keep in mind the shortcomings related to the read vs update frequency. Use dlt to do it at loading and keep everything downstream clean and simple.

Want to discuss? Join the dlt slack community!

· 4 min read
Aman Gupta

Hello, I'm Aman Gupta. Over the past eight years, I have navigated the structured world of civil engineering, but recently, I have found myself captivated by data engineering. Initially, I knew how to stack bricks and build structural pipelines. But this newfound interest has helped me build data pipelines, and most of all, it was sparked by a workshop hosted by dlt.

info

dlt (data loading tool) is an open-source library that you can add to your Python scripts to load data from various and often messy data sources into well-structured, live datasets.

The dlt workshop took place in November 2022, co-hosted by Adrian Brudaru, my former mentor and co-founder of dlt.

An opportunity arose when another client needed data migration from FreshDesk to BigQuery. I crafted a basic pipeline version, initially designed to support my use case. Upon presenting my basic pipeline to the dlt team, Alena Astrakhatseva, a team member, generously offered to review it and refine it into a community-verified source.

image

My first iteration was straightforward—loading data in replace mode. While adequate for initial purposes, a verified source demanded features like pagination and incremental loading. To achieve this, I developed an API client tailored for the Freshdesk API, integrating rate limit handling and pagination:

class FreshdeskClient:
"""
Client for making authenticated requests to the Freshdesk API. It incorporates API requests with
rate limit and pagination.
"""

def __init__(self, api_key: str, domain: str):
# Contains stuff like domain, credentials and base URL.
pass

def _request_with_rate_limit(self, url: str, **kwargs: Any) -> requests.Response:
# Handles rate limits in HTTP requests and ensures that the client doesn't exceed the limit set by the server.
pass

def paginated_response(
self,
endpoint: str,
per_page: int,
updated_at: Optional[str] = None,
) -> Iterable[TDataItem]:
# Fetches a paginated response from a specified endpoint.
pass

To further make the pipeline effective, I developed dlt resources that could handle incremental data loading. This involved creating resources that used dlt's incremental functionality to fetch only new or updated data:

def incremental_resource(
endpoint: str,
updated_at: Optional[Any] = dlt.sources.incremental(
"updated_at", initial_value="2022-01-01T00:00:00Z"
),
) -> Generator[Dict[Any, Any], Any, None]:
"""
Fetches and yields paginated data from a specified API endpoint.
Each page of data is fetched based on the `updated_at` timestamp
to ensure incremental loading.
"""

# Retrieve the last updated timestamp to fetch only new or updated records.
updated_at = updated_at.last_value

# Use the FreshdeskClient instance to fetch paginated responses
yield from freshdesk.paginated_response(
endpoint=endpoint,
per_page=per_page,
updated_at=updated_at,
)

With the steps defined above, I was able to load the data from Freshdesk to BigQuery and use the pipeline in production. Here’s a summary of the steps I followed:

  1. Created a Freshdesk API token with sufficient privileges.
  2. Created an API client to make requests to the Freshdesk API with rate limit and pagination.
  3. Made incremental requests to this client based on the “updated_at” field in the response.
  4. Ran the pipeline using the Python script.

While my journey from civil engineering to data engineering was initially intimidating, it has proved to be a profound learning experience. Writing a pipeline with dlt mirrors the simplicity of a GET request: you request data, yield it, and it flows from the source to its destination. Now, I help other clients integrate dlt to streamline their data workflows, which has been an invaluable part of my professional growth.

In conclusion, diving into data engineering has expanded my technical skill set and provided a new lens through which I view challenges and solutions. As for me, the lens view mainly was concrete and steel a couple of years back, which has now begun to notice the pipelines of the data world.

Data engineering has proved both challenging, satisfying, and a good career option for me till now. For those interested in the detailed workings of these pipelines, I encourage exploring dlt's GitHub repository or diving into the documentation.

· 8 min read
Aman Gupta

💡 This article explores methods for monitoring transactional events, allowing immediate action and data capture that might be lost otherwise. We focus on Github, Slack, and Hubspot, demonstrating techniques applicable to low-volume transactional events (under 500k/month) within the free tier. For clickstream tracking or higher volumes, we recommend more scalable solutions.

There’s more than one way to sync data. Pulling data after it has been collected from APIs is a classic way, but some types of data are better transmitted as an event at the time of happening. Our approach is event-triggered and can include actions like:

ApplicationAction
SlackSending messages in Slack
GithubCommit, comment, or PR actions
HubspotObject creation or meeting specific criteria

These actions initiate a webhook that sends a POST request to trigger a DLT pipeline for event ingestion. The data is then loaded into BigQuery.

pictorial_demonstration

This setup enables real-time alerts or event storage for later use. For example, let’s say you want to alert every time something happens - you’d want to be able to capture an event being sent to you and act on it. Or, in some cases, you store it for later use. This guide covers a use case for deploying and setting up webhooks.

Why do we use webhooks?

Whenever we want to receive an event from an external source, we need a “recipient address” to which they can send the data. To solve this problem, an effortless way is to use a URL as the address and accept a payload as data.

Why cloud functions?

The key reasons for using cloud functions include:

  1. To have a URL up and accept the data payload, we would need some service or API always to be up and ready to listen for the data.

  2. Creating our application for this would be cumbersome and expensive. It makes sense to use some serverless service for low volumes of events.

  3. On AWS, you would use API gateway + lambda to handle incoming events, but for GCP users, the option is more straightforward: Google Cloud functions come with an HTTP trigger, which enables you to create a URL and accept a payload.

  4. The pricing for cloud functions is unbeatable for low volumes: For ingesting an event with a minor function, assuming processing time to be a few seconds, we could invoke a few hundred thousand calls every month for free. For more pricing details, see the GCP pricing page for cloud functions.

Let's dive into the deployment of webhooks and app setup, focusing next on triggers from GitHub, Slack, and HubSpot for use cases discussed above.

1. GitHub Webhook

This GitHub webhook is triggered upon specified events such as pull requests (PRs), commits, or comments. It relays relevant data to BigQuery. Set up the GitHub webhook by creating the cloud function URL and configuring it in the GitHub repository settings.

1.1 Initialize GitHub webhook deployment

To set up the webhook, start by creating a cloud function. Follow these brief steps, and for an in-depth guide, please refer to the detailed documentation.

  1. Log into GCP and activate the Cloud Functions API.

  2. Click 'Create Function' in Cloud Functions, and select your region and environment setup.

  3. Choose HTTP as the trigger, enable 'Allow unauthenticated invocations', save, and click 'Next'.

  4. Set the environment to Python 3.10 and prepare to insert code into main.py:

    import dlt
    import time
    from google.cloud import bigquery
    from dlt.common import json

    def github_webhook(request):
    # Extract relevant data from the request payload
    data = request.get_json()

    Event = [data]

    pipeline = dlt.pipeline(
    pipeline_name='platform_to_bigquery',
    destination='bigquery',
    dataset_name='github_data',
    )

    pipeline.run(Event, table_name='webhook') #table_name can be customized
    return 'Event received and processed successfully.'
  5. Name the function entry point "github_webhook" and list required modules in requirements.txt.

    # requirements.txt
    dlt[bigquery]
  6. Post-deployment, a webhook URL is generated, typically following a specific format.

    https://{region]-{project-id}.cloudfunctions.net/{cloud-function-name}

Once the cloud function is configured, it provides a URL for GitHub webhooks to send POST requests, funneling data directly into BigQuery.

1.2 Configure the repository webhook in GitHub

Set up a GitHub repository webhook to trigger the cloud function on specified events by following these steps:

  1. Log into GitHub and go to your repository.
  2. Click "Settings" > "Webhooks" > "Add webhook."
  3. Enter the cloud function URL in "Payload URL."
  4. Choose "Content-Type" and select events to trigger the webhook, or select "Just send me everything."
  5. Click "Add webhook."

With these steps complete, any chosen events in the repository will push data to BigQuery, ready for analysis.

2. Slack Webhook

This Slack webhook fires when a user sends a message in a channel where the Slack app is installed. To set it up, set up a cloud function as below and obtain the URL, then configure the message events in Slack App settings.

2.1 Initialize Slack webhook deployment

Set up the webhook by creating a cloud function, using the same steps as for the GitHub webhook.

  1. Here’s what main.py looks like:

    import dlt
    from flask import jsonify

    def slack_webhook(request):
    # Handles webhook POST requests
    if request.method == 'POST':
    data = request.get_json()

    # Responds to Slack's verification challenge
    if 'challenge' in data:
    return jsonify({'challenge': data['challenge']})

    # Processes a message event
    if 'event' in data and 'channel' in data['event']:
    message_data = process_webhook_event(data['event'])

    # Configures and initiates a DLT pipeline
    pipeline = dlt.pipeline(
    pipeline_name='platform_to_bigquery',
    destination='bigquery',
    dataset_name='slack_data',
    )

    # Runs the pipeline with the processed event data
    pipeline.run([message_data], table_name='webhook')
    return 'Event processed.'
    else:
    return 'Event type not supported', 400
    else:
    return 'Only POST requests are accepted', 405

    def process_webhook_event(event_data):
    # Formats the event data for the DLT pipeline
    message_data = {
    'channel': event_data.get('channel'),
    'user': event_data.get('user'),
    'text': event_data.get('text'),
    'ts': event_data.get('ts'),
    # Potentially add more fields according to event_data structure
    }
    return message_data
  2. Name the entry point "slack_webhook" and include the necessary modules in requirements.txt, the same as the GitHub webhook setup.

  3. Once the cloud function is configured, you get a URL for Slack events to send POST requests, funneling data directly into BigQuery.

2.2 Set up and configure a Slack app

Create and install a Slack app in your workspace to link channel messages from Slack to BigQuery as follows:

  1. Go to "Manage apps" in workspace settings; click "Build" and "Create New App".
  2. Choose "from scratch", name the app, select the workspace, and create the app.
  3. Under "Features", select "Event Subscription", enable it, and input the Cloud Function URL.
  4. Add message.channels under "Subscribe to bot events".
  5. Save and integrate the app to the desired channel.

With these steps complete, any message sent on the channel will push data to BigQuery, ready for analysis.

3. Hubspot webhook

A Hubspot webhook can be configured within an automation workflow, applicable to contacts, companies, deals, tickets, quotes, conversations, feedback submissions, goals and invoices. It triggers upon specific conditions or data filters. To establish it, create a cloud function, retrieve its URL, and input this in Hubspot's automation workflow settings for message events.

3.1 Initialize Hubspot webhook deployment

Set up the webhook by creating a cloud function, using the same steps as for the GitHub webhook.

  1. Here’s what main.pylooks like:

    import dlt
    from flask import jsonify

    def hubspot_webhook(request):
    # Endpoint for handling webhook POST requests from Hubspot
    if request.method == 'POST':
    # Get JSON data from the POST request
    data = request.get_json()

    # Initialize and configure the DLT pipeline
    pipeline = dlt.pipeline(
    pipeline_name="hubspot",
    destination='bigquery', # Destination service for the data
    dataset_name='hubspot_webhooks_dataset', # BigQuery dataset name
    )

    # Execute the pipeline with the incoming data
    pipeline.run([data], table_name='hubspot_contact_events')

    # Return a success response
    return jsonify(message='HubSpot event processed.'), 200
    else:
    # Return an error response for non-POST requests
    return jsonify(error='Only POST requests are accepted'), 405

  2. Name the entry point "your_webhook" and include the necessary modules in requirements.txt, the same as the GitHub webhook setup.

  3. Once the cloud function is configured, you get a URL for Slack events to send POST requests, funneling data directly into BigQuery.

3.2 Configure a Hubspot automation workflow

To activate a Hubspot workflow with your webhook:

  1. Go to Hubspot: "Automation" > "Workflows" > "Create workflow".
  2. Start from scratch; choose "Company-based" for this example.
  3. Set "Object created" as the trigger.
  4. Add the "Send a webhook" action, use the "POST" method, and input your webhook URL.
  5. Select the company properties to include, test, and save.

This triggers the webhook upon new company creation, sending data to Bigquery via DLT.

In conclusion

Setting up a webhook is straightforward.

Using dlt with schema evolution, we can accept the events without worrying about their schema. However, for events with custom schemas or vulnerable to bad data quality or abuse, consider using dlt’s data contracts.

· 9 min read
Adrian Brudaru

In a recent article, Anna Geller, product manager at Kestra, highlighted why data ingestion will never be solved. In her article, she described the many obstacles around data ingestion, and detailed how various companies and open-source tools approached this problem.

I’m Adrian, data builder. Before starting dlthub, I was building data warehouses and teams for startups and corporations. Since I was such a power-builder, I have been looking for many years into how this space could be solved.

The conviction on which we started dlt is that, to solve the data ingestion problem, we need to identify the motivated problem solver and turbo charge them with the right tooling.

The current state of data ingestion: dependent on vendors or engineers.

When building a data pipeline, we can start from scratch, or we can look for existing solutions.

How can we build an ingestion pipeline?

  • SaaS tools: We could use ready-made pipelines or use building blocks to configure a new API call.
  • SDKs: We could ask a software developer to build a Singer or Airbyte source. Or we could learn object-oriented programming and the SDKs and become the software developer - but the latter is an unreasonable pathway for most.
  • Custom pipelines: We could ask a data engineer to build custom pipelines. Unfortunately, everyone is building from scratch, so we usually end up reinventing the flat tire. Pipelines often break and have a high maintenance effort, bottlenecking the amount that can be built and maintained per data engineer.

Besides the persona-tool fit, in the current tooling, there is a major trade-off between complexity. For example, SaaS tools or SaaS SDKs offer “building blocks” and leave little room for customizations. On the other hand, custom pipelines enable one to do anything they could want but come with a high burden of code, complexity, and maintenance. And classic SDKs are simply too difficult for the majority of data people.

etl_by_others.png

So how can we solve ingestion?

Ask first, who should solve ingestion. Afterwards, we can look into the right tools.

The builder persona should be invested in solving the problem, not into preserving it.

UI first? We already established that people dependent on a UI with building blocks are non-builders - they use what exists. They are part of the demand, not part of the solution.

SDK first? Further, having a community of software engineers for which the only reason to maintain pipelines is financial incentives also doesn’t work. For example, Singer has a large community of agencies that will help - for a price. But the open-source sources are not maintained, PRs are not accepted, etc. It’s just another indirect vendor community for whom the problem is desired.

The reasonable approach is to offer something to a person who wants to use the data but also has some capability to do something about it, and willingness to make an effort. So the problem has to be solved in code, and it logically follows that if we want the data person to use this without friction, it has to be Python.

So the existing tools are a dead end: What do custom pipeline builders do?

Unfortunately, the industry has very little standardization, but we can note some patterns.

df.to_sql() was a great first step

For the Python-first users, pandas df.to_sql() automated loading dataframes to SQL without having to worry about database-specific commands or APIs.

Unfortunately, this way of loading is limited and not very robust. There is no support for merge/upsert loading or for advanced configuration like performance hints. The automatic typing might sometimes also lead to issues over time with incremental loading.

Additionally, putting the data into a dataframe means loading it into memory, leading to limitations. So a data engineer considering how to create a boilerplate loading solution would not end up relying on this method because it would offer too little while taking away fine-grain control.

So while this method works well for quick and dirty work, it doesn’t work so well in production. And for a data engineer, this method adds little while taking away a lot. The good news: we can all use it; The bad news: it’s not engineering-ready.

Inserting JSON directly is a common antipattern. However, many developers use it because it solves a real problem.

Inserting JSON “as is” is a common antipattern in data loading. We do it because it’s a quick fix for compatibility issues between untyped semi-structured data and strongly typed databases. This enables us to just feed raw data to the analyst who can sort through it and clean it and curate it, which in turn enables the data team to not get bottlenecked at the data engineer.

So, inserting JSON is not all bad. It solves some real problems, but it has some unpleasant side effects:

  • Without an explicit schema, you do not know if there are schema changes in the data.
  • Without an explicit schema, you don’t know if your JSON extract path is unique. Many applications output inconsistent types, for example, a dictionary for a single record or a list of dicts for multiple records, causing JSON path inconsistencies.
  • Without an explicit schema, data discovery and exploration are harder, requiring more effort.
  • Reading a JSON record in a database usually scans the entire record, multiplying cost or degrading performance significantly.
  • Without types, you might incorrectly guess and suffer from frequent maintenance or incorrect parsing.
  • Dashboarding tools usually cannot handle nested data - but they often have options to model tabular data.

Boilerplate code vs one-offs

Companies who have the capacity will generally create some kind of common, boilerplate methods that enable their team to re-use the same glue code. This has major advantages but also disadvantages: building something like this in-house is hard, and the result is often a major cause of frustration for the users. What we usually see implemented is a solution to a problem, but is usually immature to be a nice technology and far from being a good product that people can use.

One-offs have their advantage: they are easy to create and can generally take a shortened path to loading data. However, as soon as you have more of them, you will want to have a single point of maintenance as above.

The solution: A pipeline-building dev tool for the Python layman

Let’s let Drake recap for us:

what would drake do

So what does our desired solution look like?

  • Usable by any Python user in any Python environment, like df.to_sql()
  • Automate difficult things: Normalize JSON into relational tables automatically. Alert schema changes or contract violations. Add robustness, scaling.
  • Keep code low: Declarative hints are better than imperative spaghetti.
  • Enable fine-grained control: Builders should be enabled to control finer aspects such as performance, cost, compliance.
  • Community: Builders should be enabled to share content that they create

We formulated our product principles and went from there.

And how far did we get?

  • dlt is usable by any Python user and has a very shallow learning curve.
  • dlt runs where Python runs: Cloud functions, notebooks, etc.
  • Automate difficult things: Dlt’s schema automations and extraction helpers do 80% of the pipeline work.
  • Keep code low: by automating a large chunk and offering declarative configuration, dlt keeps code as short as it can be.
  • Fine-grained control: Engineers with advanced requirements can easily fulfill them by using building blocks or custom code.
  • Community: We have a sharing mechanism (add a source to dlt’s sources) but it’s too complex for the target audience. There is a trade-off between the quality of code and strictness of requirements which we will continue exploring. We are also considering how LLMs can be used to assist with code quality and pipeline generation in the future.

What about automating the builder further?

LLMs are changing the world. They are particularly well-suited at language tasks. Here, a library shines over any other tool - simple code like you would write with dlt can automatically be written by GPT.

The same cannot be said for SDK code or UI tools: because they use abstractions like classes or configurations, they deviate much further from natural language, significantly increasing the complexity of using LLMs to generate for them.

LLMs aside, technology is advancing faster than our ability to build better interfaces - and a UI builder has been for years an obsolete choice. With the advent of self-documenting APIs following OpenAPI standard, there is no more need for a human to use a UI to compose building blocks - the entire code can be generated even without LLM assistance (demo of how we do it). An LLM could then possibly improve it from there. And if the APIs do not follow the standard, the building blocks of a UI builder are even less useful, while an LLM could read the docs and brute-force solutions.

So, will data ingestion ever be a fully solved problem? Yes, by you and us together.

In summary, data ingestion is a complex challenge that has seen various attempts at solutions, from SDKs to custom pipelines. The landscape is marked by trade-offs, with existing tools often lacking the perfect balance between simplicity and flexibility.

dlt, as a pipeline-building dev tool designed for Python users, aims to bridge this gap by offering an approachable, yet powerful solution. It enables users to automate complex tasks, keep their code concise, and maintain fine-grained control over their data pipelines. The community aspect is also a crucial part of the dlt vision, allowing builders to share their content and insights.

The journey toward solving data ingestion challenges is not just possible; it's promising, and it's one that data professionals together with dlt are uniquely equipped to undertake.

Resources:

This demo works on codespaces. Codespaces is a development environment available for free to anyone with a Github account. You'll be asked to fork the demo repository and from there the README guides you with further steps.
The demo uses the Continue VSCode extension.

Off to codespaces!

DHelp

Ask a question

Welcome to "Codex Central", your next-gen help center, driven by OpenAI's GPT-4 model. It's more than just a forum or a FAQ hub – it's a dynamic knowledge base where coders can find AI-assisted solutions to their pressing problems. With GPT-4's powerful comprehension and predictive abilities, Codex Central provides instantaneous issue resolution, insightful debugging, and personalized guidance. Get your code running smoothly with the unparalleled support at Codex Central - coding help reimagined with AI prowess.